Uploading/Checking drainage assets
To upload/check tasks in GDMS, go to the Main Menu > Drainage Assets > Upload/Check Asset System.
A new window opens called Create Upload Task. This has mandatory fields for completion and has the option to upload for checking only. Checking only will not allow for subsequent import of the data, even if the upload passes all the checks. During creation, you must add an activity set reference and attach a ZIP file. Press Save when all has been completed
Please note, the tick box for checking only is pre-selected for Reviewers and cannot be unticked.
The next page is an Upload Task page, which has details of the upload. This is a summary of the upload task and corrective actions to any errors that have occurred. You must address the corrective actions before moving on. The type of errors you may get when uploading data are covered in four categories:
- Critical Errors – prevent full checking of data (e.g. the data is in the incorrect format). These errors must be resolved in the dataset and re-uploaded by the user before checking can continue.
- Errors – Any issues with the data after a complete run of the upload checks that prevent import (e.g. a mandatory field not being populated). These errors must be resolved in the dataset and re-uploaded by the user before the data can be imported.
- Warnings – Possible errors in the data that should be reviewed by the data supplier (e.g. an attached file is included in the upload, but not referenced in the data). These warnings do not prevent data from being imported.
- Data Loss Warnings – If the dataset is imported then some existing data may be archived or “lost”. The data can be imported by a user with sufficient permissions levels.
You will get a data loss warning if you are archiving an asset that has condition data, archiving an asset with attached files or archiving an asset that was a priority asset.
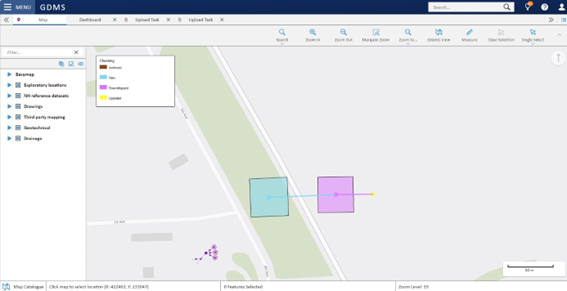
If data has no errors, it will be possible to Display on Map. Clicking this will show the uploaded asset systems on the map compared to the previous asset system version. It will highlight the assets in different colours as follows:
- Archived – asset will be archived upon upload.
- New – asset has been added.
- Roundtripped – asset has not changed.
- Updated – asset has been updated in either location, inventory or condition.
At this point, the task stage will be updated. You can Refresh from the Command Bar to update the task stage.
There is an option to download a results file of all warnings and errors. Select Download Check Results CSV from the Command Bar.
You can also view upload tasks in the Dashboard. Select drainage data upload/check tasks in the Dashboard, then view details.